

How to Restrict Bot to One Channel, Step-by-Step
In 2021, Discord introduced its users to the new slash commands. Before that, you used text commands in a public channel to talk to a bot (a.k.a. a content prefix, like the ‘pls help’ command of the Dank Memer bot, where the ‘pls’ is the content prefix).
This meant you needed to know exactly what the right command word was. Indeed, many servers become cluttered by people trying a bunch of words when wanting to use bot commands.
When text commands existed, the way to restrict them to a single channel involved denying the ‘View Channel’ permission to every bot for every channel you don’t want them to be in. Luckily, the introduction of the new slash commands made this simpler.
With slash commands, typing a “/” brings up a command picker where you can view all the commands available, and view each bot-specific commands separately. Additionally, each command includes a brief description of what they do.
So enter your Discord server, and follow the steps below. Let’s see, in only a few steps, how to restrict bot to one channel:
1. Go to ‘Integrations’
First, right-click on your server’s icon on the left side of the screen. From there, hover over ‘Server Settings’, and from the menu that opens up select ‘Integrations‘.

2. Click ‘Manage’ next to each bot
Once on the ‘Integrations’ page, scroll down to ‘Bots and Apps’. There, you will see all the bots available on your server. The process of restricting the use of commands for certain channels is done one bot at a time, so, to begin with, click on ‘Manage‘ next to the first bot.

3. Modify slash commands permissions
Once in the settings, you will be able to modify which members or roles can use commands, and also which channels allow commands. Here, we will restrict bot to one channel, so, next to the ‘Channels’ menu click on ‘Add Channels’.

4. Add channels
Next, from the window that pops up, select all the channels in your server and click ‘Add‘.

5. Use toggles to modify which channels allow commands
Once you add the server’s channels, click the ✓ icon in the channel you want members to use bots. For this example, I want users to use slash commands only in the #bot-commands channel. Now, users won’t be able to use slash commands in any other channel with the X selected.

Keep in mind that is necessary that the ‘All Channels’ option at the top has also the green checkmark selected. Otherwise, it won’t work.
If you want to modify which members or roles are able to use bot commands, the process is exactly the same, by clicking on ‘Add Roles & Members’ in the ‘Roles & Members’ menu.
There’s also a command-specific list, where you can make customized permissions for each command. By default, these are all synced to the command permission at the top. However, you can unsync an individual command to make further customizations.
6. Verify that your changes have taken place
Make sure to view the server as a non-admin role or switch accounts to a non-admin user to test the new permissions. Otherwise, it won’t work.
For this example, we entered the server as a non-admin user to test the settings. However, if you don’t have an alternative user, you can view the server as a non-admin role as well. To do this, go to ‘Server Settings’, and then, ‘Roles’. Lastly, select a non-admin role, scroll to the bottom, and click on ‘View Server As Role’.

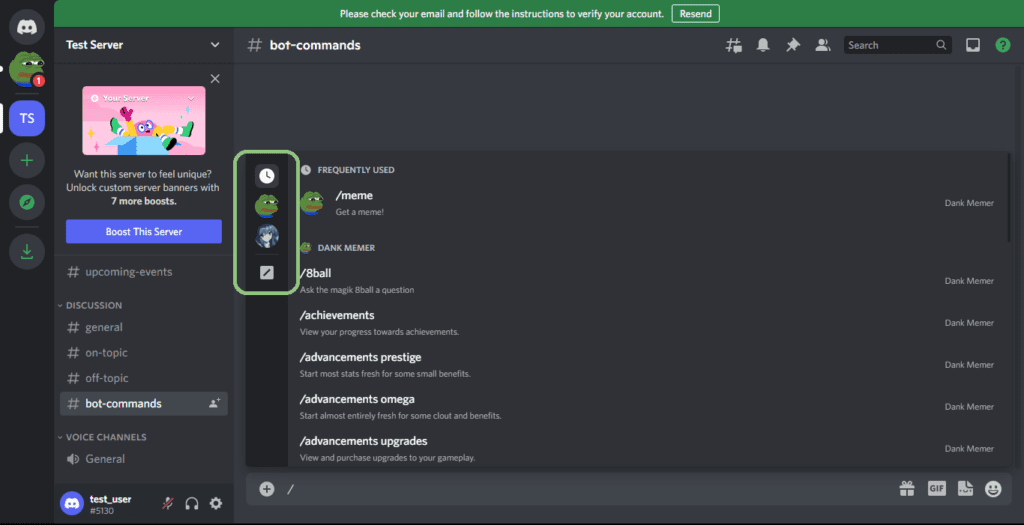
As you can see, this user only has built-in commands available. It can’t use bot commands in the #general channel, and in any other channels, except for the #bot-commands channel:
And that’s all there is to it. Now you have successfully managed the bots’ activity on the server. Next, make sure you know the basic rules for a Discord server to keep it even more organized!